Wednesday, December 30, 2009

Has it really been this long??


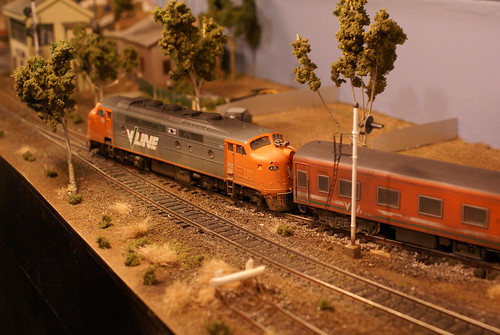
A73 departs the new Liralau yard with an intercity service for Melbourne

Since the last update (I still can't believe it has been almost a year!), work has continued on replacing the last three original modules which were all suffering from poor construction, which ultimatley saw the trackbeds warp and become almost unusable.

Following on from the layouts last appearance - at the '09 Adelaide Model Railway Exhibition, it became evident that something needed to be done about the layouts appearance, and so work commenced rebuilding the layout to a design similar to Keiren Ryan's $100 module, where the layout, backscene, lighting and pelmet is all incorporated into one unit. My design differs in that we used some of the existing modules to allow and so ours dont have that nice curved backscene - not that it matters - the layout looks 100 times better now than it did.


The station yard has been replaced - the centre piece being the large two-cell grain silo - a combination of three walthers cornerstone kits. All turnout control is being converted to DCC - using the ANE Models servo system (have a look at the NMRA's page on them: http://www.nmra.org.au/Hints/Servo/servo.html) - which is a great easy alternative to having to build CDU's and use the goold-old peco point motors - not to mention that the boards also look after your signal controls so it is very easy (in theory) to wire in your signals - I am still working on getting my signals to work correctly - hours and hours have been spent trying to trace back the intermittent problems with the signals which I am now thinking may be caused by a broken wire somewhere inside the insulation on one of the leads. Time to strip and re-wire them again (third time lucky perhaps).


Speaking of signals - I have built and installed two of the San Mateo Line VR colour light signal kits, produced by Bill Dick of Mildura - these kits, while fidly produce a very fine representation of a VR colour light signal. These are also available in SAR configuration. More of these signals will be installed when time permits.


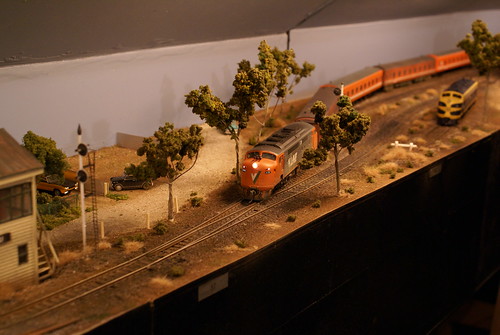
We still have another two modules to rebuild before we pack the layout into a trailer and set off for the Healesville show in March - thankfully the last two modules should only be two weekends work, and then we can get down to buisness and get some trains running - and perhaps run in my three new loco's - my scratchbuilt H class 4-8-4 'H220', and my new Auscision A and B class locos (which are incredible pieces of kit by the way!).


Sunday, March 15, 2009

Continuing on...


Over the past weekend work on the new module has picked up some pace, which is good considering Liralau's next scheduled outing is in three weeks!


The wooden crossing gates in the above photo are modified Peco gates which come in their Setrack range of accessories... at $18 these were rather expensive, but given time is rapidly running out, I figure that that investment is worth it in the long run.


The pub has been positioned and is in the process of being bedded into the scenery which is just starting to take shape. I purchased two LJ kits to fill in the main street, as unfortunatley I just wont have the time to scratchbuild two more buildings.

The road surfacing is complete and I am very impressed with the results - I used plaster to create the road surface and then sprayed it once it was dry and had been sanded with a mixture of 3 parts Floquil Weathered Black to 1 part Floquil Engine Black, before weathering it with a mixture of artists chalks.

The end result, has been one which suprised me, in a good way!


The streetlights have been made from dowel and some old 5mm LED's which I had fried while fitting out a locomotive with a DCC chip.
Next weekend, I intend to complete the scenery and wire the module.

Until then... happy modelling!


Sunday, March 1, 2009

Work Continues...


Over the past week work has slowly continued with the new module.

The mainline has been partially laid - permanently as far as the level crossing, but the remainder of the mainline is pinned temporarily, until I have some time to construct the mounting bracket for the off-scene setup tracks.

The tramway permanent way was laid, using Atlas Code 100 flex, which was re-railed using N scale Code 80 rail, producing a far finer rail profile to be embedded in the road surface. The footpaths were made from 1.5mm Styrene sheet, and the road surface then filled using plaster, tinted with a few drops of Floquil Engine Black - just enough to get rid of the stark white appearance of plaster in its natural form. Unfortunately, I ran out of plaster, combined with unexpected visitors meant that the opportunity to get some more supplies was limited.


The pub has also received its signage, which means the pub only needs me to get around to painting the downpipes, TV antenna and conduits until its finished.

Also progressing slowly is my model of Vinelander sleeping car #14 - I finally got some Microscale Krystal Cleer which means the windows have finally been glazed and as I type this, I am waiting for the windows to dry!

Anyway, thats the extent of progress to date.

Happy Modelling!

Sunday, February 22, 2009

Liralau upgrade - the replacement module

After dropping the township module prior to the NMRI show in October, I decided to rebuild the township module - this time with the same dimensions as the previous 'new' corner module we built prior to the said show (the bridges module).

So that said, I scheduled a work session on Saturday 21st February, which saw Ashleigh Bennett and Graham Nixon arrive to give me a hand. Fortunately (or unfortunately??) we got the beers out while waiting for Ash to arrive, and as such got about as far as marking up a sheet of chipboard before sitting down with a couple more brews and having a good old chat about days gone by- and the quality of American railway DVD commentaries (after I spent 5 minutes trying to work out why the dvd player wouldn't open the disk tray - turns out I was pushing the on/off button hic!).

After Ash and Graham headed home, I actually did some work, and after a little extra work on Sunday afternoon, I had the basic module built - now waiting on a few bits and pieces before I can start on the scenery - track being a major material I had none of.

So hopefully over the next few weeks, this module will start to take shape.


Saturday, February 14, 2009

RBJ1 gets an underframe


RBJ1 - looking at its servery side.

Following on from the previous post, RBJ1 received its underframe and bogies this afternoon. The underframe is scratchbuilt from various sizes Evergreen styrene rod, 'I' beam etc and a number of SEM underframe components (ie brake cylinders etc).

While the handbrake is not the correct type, the SEM 'Miners' style handbrake was all I could get my hands on at the time.

The bogies are Powerline Models 'Commonwealth' bogies which I am in the process of modifying to suit the Overland cars mounting pad. In the photos below, the car is just resting on the bogies.

The body also recieved its concertina's - which are modified Steam Era W car corridoor connectors.


It isn't N scale - but it looks like it! RBJ1 basking in the evening sun after being mounted on its bogies and underframe!


Still to be added is couplers, coupler lift bars, handrails, shunters steps, Electrical jumper leads, airhoses... the list goes on and on and on.

Saturday, February 7, 2009

Finally some cool weather - the RBJ body receieves decals

Well the cool change finally arrived overnight, and as a result allowed me to get the paint and decals onto the RBJ body. The body is a multi-piece polyurethane casting, which I produced from styrene masters. Now I have to start on the underframe and interior, part of which is sitting on the bench next to me as I type this. The car is fitted with home made flush glazing - made from CD Cover styrene. This was an incredibly long and drawn out process, but was worth it in the long run. Blinds are simply pieces of masking tape.


The Vestibule detail - still waiting on handbrake, airlines etc


The non-servery side of the vehicle. The small white window at the non-vestibule end is the gents toilets.


The RBJ with the PCO and Nicks motorail wagon.


The servery side of the vehicle.

Friday, February 6, 2009

The Overland - Scratchbuilding the western lines premier passenger train

Over the past few years, this is one of those projects which for me has been on and off the theoretical to-do list. Nick (my brother, who no doubt, you will all get to know through these blogs as time goes on) has been bugging me to get this project back on track (please excuse the pun).

I have always had a soft spot for the Overland, particuarly as it was the interstate train I ever travelled on - departing Adelaide on 17th March 1997, behind trusty MKA rebuild CLP16 - ah the memories come flooding back! Thats not to say that my interest in it began then! I remember returning to Adelaide as a 3 or 4 year old on one of Steamranger's (ARHS SA Div) Southern Encounter services to the South Coast, and pulling up over the Goodwood road underpass at Millswood to allow N457 drag a Melbourne bound Overland up the hill. Naturally this was in the days before the main south was converted to the "narrow gauge" of 4' 8 1/2". (as an aside N457 will be the number of the locomotive I purchase from Auscision when the N is released this year).

Most Saturday evenings until late 1998/99 the family made the trek to Keswick Passenger Terminal to watch the departure of the Overland - sadly this came to an end when the Saturday evening services were abolished, and then later again when the timetable changed for Daylight running over the Adelaide to Melbourne leg of the journey during 2000. My passion for this train did not cease however, and on finishing school, I applied to work for Great Southern Railway at Keswick Terminal, which eventually saw me rostered onto the 'night shift' which revolved around the Overland, and saw my now Fiancee Sarah and myself head to Melbourne on the trial run of the refurbished Overland during May 2007.


We had originally intended to produce a series of kits of these cars, but unfortunatley, at the 2009 Modelling the Railways of South Australia convention, it was brought to our attention a number of times during the day that there was a very nice set of pre-production samples of the AJ, PCO, CO and a JTA twinette sleeping car on display - being produced by Noel Potter and Bruce McGuinness. Now these are very very nice models, with full interiors, correct Commonwealth bogies, correct under carriage detail the works - and at only $60 each for the power and baggage vans, and $70-$80 for the others - they've hit a home run in my books.

Unfortunatley for us, this meant canning a project that had finally gained some momentum - after about 5 months, we made the decision to start again, this time making a set for ourselves. Back in 2007, I made a set of moulds for the RBJ Economy class refreshment car, and as a result I am now in the process of making up an 'improved' version of the masters to get our project back on track.


I recently completed rebuilding an ancient Hornby VR baggage car into a PCO power van for the said train. This project appeared simple, but in reality was a little more complex than I had ever imagined it would have been. Having said this, it turned out rather well, and I believe it is a fine representation of such a car. The changes included relocating the large baggage doors, initially re-profiling the roof - which later turned into replacing the roof, adding extra windows/filling in of non-required windows, reworking the vehicle ends, adding new concertinas, new panelling above the windows, fitting of anti-stress ribbing between the windows and a multitude of smaller bits and pieces. The car was then finished in Floquil Old Silver for the stainless steel panels, Floquil PRR Maroon for the regal red car sides and ends, and Humbrol Matt Black for the roof. The car was then decalled with BGB Models decals before being given a light coat of weathering and liberal coat of Testors DullCote to seal the deal. The roof itself was a piece of re-profiled north-eastern wood shape.


Check back soon, and I hope to have some photos of the RBJ to show off - now a cool change is less than 24hours away - construction can finally re-commence!

Thursday, February 5, 2009

Liralau on show - photos from the NRMI show Oct '08


The layout, with Pete Semmel carefully waiting for a cross of his Overland with the local freight.


Pete Semmel and the layout's Mascot "Bill" (named after Bill Lawry - for its proboscitis, or huge nose for those who don't follow the Billy Birmingham's Twelfth Man CD's)


Oops.... what happens when you are watching Bathurst and running a DCC layout - T375 and Y175 have come to grief at the Portland end of the layout.


Nick - Playing Trains


The October crew, after we took out "Best in Display - Peers Vote". L-R Pete Semmel, Ashleigh Bennett, Pete Michalak and Nick Michalak (with the trophy at the front).


X44 in the loop in Liralau yard.


Y175 shunting Liralau yard.


Ashleigh Bennett's 943 hauling Pete Semmels Overland out of the rear storage tracks.

Liralau - a freelanced VR branch line


For some time now, I have been rambling on about my exhibition layout 'Liralau' on the likes of Railsa and Railpage, and after discussing the benefits of a blog with fellow blogger Iain Kennedy at the club rooms of the South Australian Railway Modellers Association on Wednesday evening, I decided it was time to make one of my own.

To set things straight, when I built the first module of Liralau (now retired, read replaced) it was nothing more than a diorama to photograph completed models on... oh if I knew what I was in for way back then!

Now the layout measures almost 6metres x 2.5metres and is a pretty typical Australian exhibition layout, with a sceniced front with hidden storage sidings at the back.

Prior to the NRMI exhibition at the former Mitsubishi Motors Australia plant in Tonsley (a southern suburb of Adelaide), I dropped the township module, so over the next two months I will build a replacement module complete with a SECV inspired tramway (with a Bendigo Birney tram) and a decent pub (See photo below).


The Commercial Hotel, and Bendigo Birney (A very nice JEM resin kit) under construction for the new module.


The newest loco to enter the Liralau fleet - Australian Northern Railroad locomotive 2201, New Lima International NSWGR 422 class modified and painted by yours truly - don't worry, it ain't my cup of tea, but Nick certainly likes it! Its fitted with an NCE DA-SR decoder, and has flashing ditchlights and rides on a modified Athearn SD9 chassis.


Below is a post I made on RailSA regarding the lessons learnt during the operation and construction of this layout:

I've been following a few different layout blogs over the past few months and thought it wise to discuss a few of my own ideas for those of you considering building an exhibition layout.

Over the past two years of exhibiting Liralau, we have had our fair share of joys and tribulations (as most layouts would).

When I designed Liralau, I was told by several members of SARMA, that it couldn't be done - not to worry, we did it anyway, so this leads to my first thought - don't listen to anyone who tells you it can't be done - of course it can! Secondly, some members told me, that I would learn a lot from the first layout - truer words could not be spoken - we already have plans for Liralau's replacement (probably two-three years away minimum) but a prototype location in western Victoria.


I built Liralau with its characteristic small modules (600mm x 330mm for most modules) with the ends being 750mm x 330mm, solely for the reason that I had to fit the whole layout in the back of my 2000 kia rio. Having completed this layout, I wouldn't ever, ever, ever, ever do this again. Minimum length for a new layout module would be at least 1200mm long, but I would retain, if possible the 300mm (or 330mm) width for ease of handling. To transport, a larger, more powerful car will have to be purchased, along with a trailer to move the layout, but that's already in the planning stage.


When building these modules, my trackbed's varied to try out different materials - admittedly using 3mm MDF craftboard probably wasn't the smartest idea - particularly as no-one bothered to inform me that MDF should be sealed with estapol or varnish first! Ply is definatley the way to go - Ive had no warping at all of any of the modules built with the ply trackbeds, however some of the MDF trackbeds have warped making joining at module ends difficult at times.


Track - new points are a must if you are building an exhibition layout - and use good quality ones too. Originally my layout was built with modified Atlas and Lifelike snap points which lasted SARMA's railshow OK, but started to show problems during AMRE 2007. Consequently all points are now PECO Streamline, but are manually driven via pull rods. Now I am getting into DCC, the new layout will most likely (may still be manual) be electrically driven via Tortoise slow speed point motors with stationary decoders fitted to allow complete control from infront of the layout, allowing discussion with the public at the front. I would also like to have all track on any new layout a minimum of code 80, as code 100 looks far too coarse for a VR mainline.


I should also make a note, that Nick was 12 and I was 18 when we started building Liralau, so funds were very limited, and we had little or no help from our parents during its construction (I can't say they didn't help as they always lend a hand when moving the layout to exhibitions and making the 100+ trees in the two weeks prior to the NRMI show last October).


Lighting is a major consideration, and shouldn't be a last minute addition - I used small spot lights available from Ikea, but when set up at home I use a string of party lights, fitted with the Enviro-Friendly fluro globes, which provides a far better light. Ideally fluro strips would be a better option, but the cost is quite high, especially as they need to be professionally wired and fitted. The new layout will most likely use these however. Also mount them out from the front of the layout, to prevent any shadows on the front edge of the layout.


Also, make sure you have a team you can rely on when it comes time to exhibit! Ash, Graham and Pete have helped us massively over the past couple of years and I thank them very much for their assistance, and hope I can rely on them in the future :) ;) If any of you have any thoughts about running on Liralau/things to be improved (besides switching to SAR, which isn't going to happen ;) ) put them down here!


OK so there's a few thoughts, but no doubt this can be added to.


Happy Modelling!